Showing posts with label how to. Show all posts

Wednesday, February 9, 2011

HAPPY VALENTINE'S DAY! & divvy it up

or "How to use up your scraps of fancy papers"

We were given a project to create for February's meeting of ECS (Edmonton Calligraphic Society) which was to create a box with 9 letters. The sample shown was

VAL

ENT

INE

however that's not something I'd have on my wall year-round. Well I could, but people would think I was weird. Which I am, but that's another story. So I opted for 'luving you'. What can I say, it was a dry day for ideas, & I had to go to a friend for that. This is how it was created:

Start with a (8"wooden) square block. (see below for how to divide an unequal measurement into equal pieces) Using clear matte medium as a paste, wrap a piece of rice paper on the front & around to the back. Paint black cheapo liquid acrylic on front & sides as a base. (Or you could just use black gesso.) Pull out all those fancy gold & red papers you've been saving for the perfect project, this is it! Then cut background squares & letters, & glue them on, alternating the color for each of the 9 squares. (Yes! the gold cross-stitch paper I saved from the 90's!) The fatter the letters, the better. Some may need a little oomph, like my U, N & Y, so outline them or the background with black pen, Gold Krylon paint or gold highlighter. Fun stuff.

Not so much fun putting all the papers away.

You can see the other samples at ECS's Facebook page. I think this is the link: http://www.facebook.com/home.php#!/group.php?gid=151228041582552

I may put the others up here after they've come out in the next guild newsletter.

Now, HOW TO DIVIDE INTO EQUAL PIECES WITHOUT A CALCULATOR
For example this green paper is 5 1/2" square & you want to divide it into 3 equal strips.
Hold the beginning of the ruler (0") against the top left corner of the paper. Find a number larger than the length of the paper that is divisible by 3; that's 6.
#1. Slide the right side of the ruler down until the 6" mark is flush with the paper edge.
6 % 3 is 2, so make a dot on the paper every 2"; at the 2" & the 4" spot.
#2. Slide the ruler down & line up the start of the ruler with the bottom left corner.
Slide the right side of the ruler to the 6" spot. Again, mark a dot at 2" and 4" .
#3. Join the upper & lower dots. To divide this page into 9 equal squares, turn the paper 1/4 turn & repeat the process.

Tuesday, August 12, 2008

Make multiple cards in a hurry

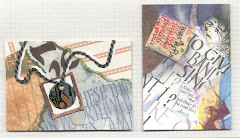
I could spend a full day creating a card! Sometimes that's not the best use of my time, so instead I might throw a whack of stuff on a large sheet of card stock (which you can buy from your local friendly printer but not just any copy shop) then chop it up & glue the pieces on. I keep a stack of 8 1/2 x 11 card stock handy ready to cut in half for 2 cards; folded to 4 1/4" x 5 1/2".

This started as a 22"x35" blank sheet. I initialy worked on top of this paper while creating other cards. All the turquoise images are from the stamps I used on Sheri & Ian's card. (See previous posting below) Why waste all that nice ink? Here's the how-to:
  1. Stamp your stamps clean on large sheet of cover weight card stock.
  2. Scatter written words throughout; I used ruling pen & brown walnut ink for lettering large-they're pretty forgiving. Try sprinkling a metallic powder like Schminke over small areas of still-wet ink. A hint from Lisa Engelbrecht is to cover the jar opening with nylon pantyhose, wrap elastic band to hold in place. This ensures you'll get a sprinkle of powder, not a clump. You can still put the lid on when you're done if the elastic's far enough down.
  3. Overlap multiple stamps using various colors dye or pigment stamp ink. I just love Suzanne Cannon's new flourish stamps @ http://www.quietfiredesign.ca/. Tiny curlicues make great fillins.
Now it's just a matter of cutting the sheet into smaller pieces & using them as the focal point on plain card stock. Double-sided adhesive tape works well.
Suzanne also has instructions to make the frame cards, which are really cool because you can see your message through the window, which takes care of "Now...what should I do on the inside". Here are the instruction for making window frame cards: http://www.quietfiredesign.com/Galleries/Projects/PinnedBackFlapsKristy.htm