Showing posts with label cards. Show all posts

Thursday, April 29, 2010

Locker room graffiti card


Here's my attempt at some "train art" in a birthday card for a 15 year old. Poor dude's BD is in September, so I went for a school locker theme, with for some added graffiti.


Enjoyed using various felt markers, gel pens and a Pilot Parallel Pen on a textured grey Laid-like piece of cardstock that was laying around.


Like most rush jobs, I kinda made it up as I went along.
This would've been before I got my pan pastels...that would've helped.

Wednesday, February 4, 2009

Card & Envelope folds


I love the way
Margaret Poznansky used photos her father took of her as a child in an accordion fold card. It's 1 long sheet; you see 2 images 'cause it was too long for the scanner. A few strokes of a pointed pen nib (allows pressure for more weight in the lines) create a playful border. The last section on the end has been scored twice to allow for the width of the card. With that folded over like a cover all that was needed was a small red ribbon tied around to add a splash of color.


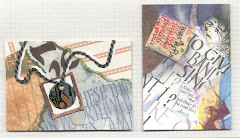
Sonja Idema comes up with the most innovative ideas. Isn't this cool how she used a much larger envelope for her tag-like greeting card; here's the front, inside view and the tag itself.


Thursday, January 8, 2009

'tis still the Season

right? I didn't mail-out any greetings this year but sure received some beautiful cards in return.
This one from Diane Waters is for all the ECS members. I've always wanted to do a card with greetings from around the world. Her greetings in foundational lettering are offset by the country of that language in a fine monoline which creates a nice texture. The bow attaches an overlay of vellum on which she added a personal message.


Cindy's Green's watercolours are looking so professional. It's that kind of day here today, and I just have to share.


I love the way Peggy Marce created such a wonderfully crisp card with one color ink and 2 nib sizes. You sure get that winter feeling...


Tuesday, August 12, 2008

Make multiple cards in a hurry

I could spend a full day creating a card! Sometimes that's not the best use of my time, so instead I might throw a whack of stuff on a large sheet of card stock (which you can buy from your local friendly printer but not just any copy shop) then chop it up & glue the pieces on. I keep a stack of 8 1/2 x 11 card stock handy ready to cut in half for 2 cards; folded to 4 1/4" x 5 1/2".

This started as a 22"x35" blank sheet. I initialy worked on top of this paper while creating other cards. All the turquoise images are from the stamps I used on Sheri & Ian's card. (See previous posting below) Why waste all that nice ink? Here's the how-to:
  1. Stamp your stamps clean on large sheet of cover weight card stock.
  2. Scatter written words throughout; I used ruling pen & brown walnut ink for lettering large-they're pretty forgiving. Try sprinkling a metallic powder like Schminke over small areas of still-wet ink. A hint from Lisa Engelbrecht is to cover the jar opening with nylon pantyhose, wrap elastic band to hold in place. This ensures you'll get a sprinkle of powder, not a clump. You can still put the lid on when you're done if the elastic's far enough down.
  3. Overlap multiple stamps using various colors dye or pigment stamp ink. I just love Suzanne Cannon's new flourish stamps @ http://www.quietfiredesign.ca/. Tiny curlicues make great fillins.
Now it's just a matter of cutting the sheet into smaller pieces & using them as the focal point on plain card stock. Double-sided adhesive tape works well.
Suzanne also has instructions to make the frame cards, which are really cool because you can see your message through the window, which takes care of "Now...what should I do on the inside". Here are the instruction for making window frame cards: http://www.quietfiredesign.com/Galleries/Projects/PinnedBackFlapsKristy.htm